micro:bit serial communication
The micro:bit can also talk to other softwares in your computer using something called the Serial protocol. Which is a way for two computers to talk to each other. The micro:bit visual programming environment comes fully equipped to communicate with your computer and other micro:bits.
For this tutorial you will need:
- a micro:bit
- a micro USB cable
- TouchDesigner installed
- to have followed the "micro:bit workflow" session
- to have followed the "introduction to TouchDesigner" session
This process is composed of two parts, you need a small piece of software running on the micro:bit that reads sensor's a button states and you need a patch in TouchDesigner (TD) that reads that data and does something with it.
Goals of this session
- To expand on the basics of micro:bit by adding your computer into the mix
- To explore physical-digital interactions
- To practice serial communication between devices
- To build an interactive sketch in TD
Setting up your microbit
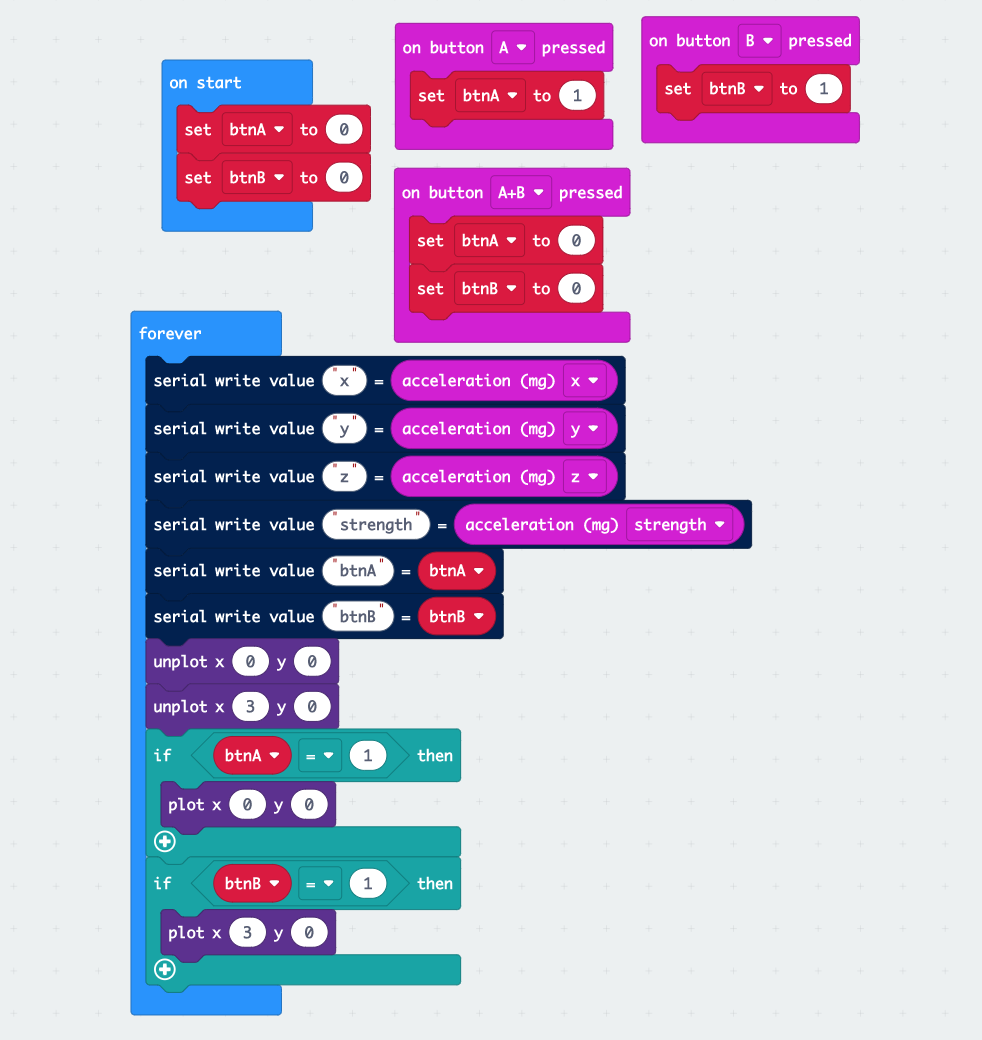
On your microbit side you need to setup your sketch so that it looks more or less like this. You can download the ready made .hex file here.

Have a look around in this sketch, observe how I am keeping the button states in two variables that I then send over serial, together with the readings from the accelerometer. Observe how I made my buttons behave as toggles and use two LEDs in the micro:bit display as immediate feedback for my toggles. That way I know what the state of my buttons is without having to inspect the data stream or fiddle my my TD patch.
Receiving your data in TD
For this patch we will be using the Serial DAT in TD and we will use a custom python script to read that serial data stream coming from the micro:bit and turn it into TD CHOP data channels. You can just copy and paste that part from the TD .toe file provided here.
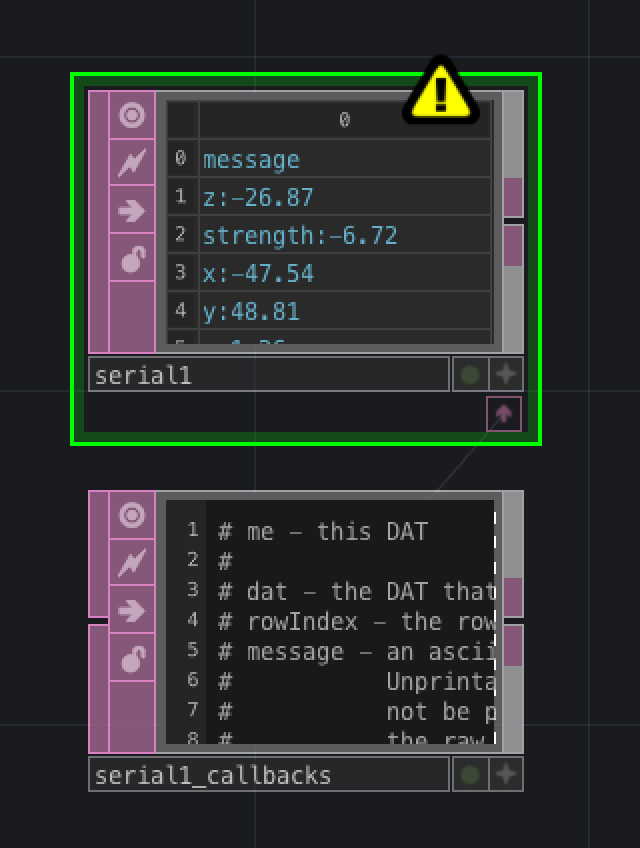
The important part in this whole patch is the Serial object and the callback, you should set them up like so.

If you see an exclamation mark in the Serial object that is because we have not yet pointed out Serial object to the correct serial device on our computer. If you are on a Windows computer your serial devices have names starting with the letters 'COM' and a number like 'COM3', 'COM5' or soemthing like that. If you are on a mac the names look more like /dev/tty.usbmodem11111 where 11111 is some number. The names are not important, this is how your computer calls the external device (micro:bit) to be able to address it and talk to it. What matters is that we select the correct one in TD.
Observe that next to the Serial object there's another object called serial1_callbacks. This object contains a script that gets called every time some data comes through the serial interface of your computer and allows us to parse that data and turn it into a TD CHOP datastream.
Here's the python code in that box:
def onReceive(dat, rowIndex, message, bytes):
    parts = message.split(":")
    value = float( parts[1] )
    label = parts[0]
    if label == "x":
        op('mbit').par.value0 = value
    elif label == "y":
        op('mbit').par.value1 = value
    elif label == "z":
        op('mbit').par.value2 = value
    elif label == "strength":
        op('mbit').par.value3 = value

    return
The next object we need to lay down in our patch is a Constant CHOP that I always call mbit, this is the object that receives the data from the python script.
That's basically it, the few other objects that I place after the mbit CHOP help with smoothing the accelerometer signal a little. Accelerometers are quite noisy and need taming. Signal smoothing is what separates the noobs from the pros.
Exercise
As you can see, I have left out the reading of the button states in our TD patch. As an exercise, extend our parser to obtain the states of our micro:bit buttons.