Understanding animation
In this module I would like to give you a broad introduction to the topic of animation and how it is used in digital media. This session is divided in three major parts:
- Fundamentals, in which we will see basic principles of how animation can help our work be more engaging and emote.
- Animation in digital media, with subsections on:
- how animation is used on devices and on-screen media.
- computational animation as used in UI design and generative design. You can find some p5js sketches here as well, to experiment with these techniques in your own sketches.
- physics-based animation, with plenty of links to examples and libraries for this kind of animations that use physics simulation instead of timelines.
- The last part is about other animation techniques that do not fit neatly into part 1 or 2 and last but not least a small light-touch review of the work of great digital animators that I personally like and that I think you might enjoy. This selection could of course be much larger and I am sure you have your own contributions for this section, feel free to suggest your own.
You will also come across sections marked with a bunny emoji 🐰, this is typical of my class notes. On a first reading you can ignore those sections. I include those in case you want to go deeper into the topic, I offer some links where you can expand on what you see in these notes, they are meant for those of you who might want to go a little deeper.
Part 1: Fundamentals
Animation is a time-based medium, in and of itself it is a huge topic. You can spend years working in animation and learn something new every day. My hope with this session is to get you interested in it with a basic introduction and specifically see in which ways animation can be used in UI design.
Animation in the context of screen-based interactions can help us orchestrate an experience in various ways. Animation can take hold of a person's attention and be used to highlight a specific event. It can also give character to an experience, making it feeling unique. Animations can make something feel well polished but if used in excess it can also make a product feel overwhelming or too busy. As everything in design, a good balance is what you should be aiming for, not too much and not too little.
Simple animations can sometimes have profound effects, think for example of the LED animation in the original macbook pro, the 2013 edition. It really made it look like your laptop was breathing slowly as if it was asleep. Animation can also be used to guide us through a complex multi-step process. Animation can be used to track time (this is used in its most prosaic form in loading spinners for example). Animation can also give attributes to our visuals that static pixels couldn't possibly convey. One way of conveying weight or lightness in the screen medium is to do it through animation. You can also convey emotion through animation like sadness, happines or anger.
As a designer you are primarily a visual communicator, you do not always have the luxury of words to convey meaning in a design. Animation is a visual language that will add depth of meaning to your work, and the way to use it wisely is to use it sparingly. Too much animation can ruin an experience by making it visually overwhelming, distracting and difficult to find your way around, but a subtle animation here and there can add polish and make the experience feel memorable and beautifully crafted.
When looking at the versatility of animation in how we perceive screen-based experiences it helps to look at the masters. It helps to look at cartoons, specially old cartoons. You may consider this an assignment if you like... watch more cartoons.
Disney's twelve basic principles of animation
In 1981 Disney animators Ollie Johnson and Frank Thomas described twelve principles of animation used at Disney studios, these principles still hold true today and have application in various fields like motion graphics, UI design, CSS animation or even light design.
Animation is primarily the art of creating in the viewer the illusion that the things that static pixels in their screen represent, are in fact in motion or emoting. Things that express, things that are heavy, light, things that have their own character, things that are happy or sad, etc.
Applying these principles will make your animations more lively and engaging. Take your time to go through them and try to apply these principles in your animation work.
Because so much about animation is about how we emotionally respond to it, some things are very hard to explain with words, it is best to see and experience with your own eyes. I will do my best however to use words to draw your attention to important details.
Staging
Staging is the craft of the actor, it is the craft of presence. When an actor walks on stage you notice them. It is the quality of presence, of being there and taking hold of the audience's attention.
Notifications often use this quality because that's what a notification wants, it wants to be noticed. It wants to draw your attention to a fleeting moment.
Squash and stretch
Of all principles this is perhaps the most versatile. Squashing and strecthing can give your work the illusion of gravity, weight, mass, rigidity and speed or all at the same time. Squashing and stretching is about pulling and pushing, squashing, bouncing, etc. It can be linked to many actions and it will intuitively feel right when used well.
Some implementations of the "pull to refresh" UI feature in most post-Twitter UIs, use this animation technique to convey a rubbery feeling, that you are literally pulling from your news feed to see what's on offer next.
Anticipation
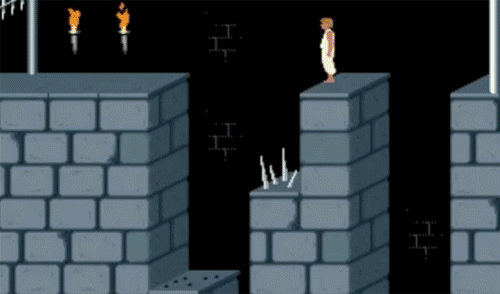
Anticipation is the sequence of movements that happens before the action we want to convey. A person jumping to get a freesbee will first run towards it, lower their center of gravity by bending their knees, just before they jump towards the freesbee. It would look fairly akward if a person could jump high and far from a standing position with their legs fully stretched, like Mario. Anticipation allows for actions to flow naturally.
Mario is a good example of a character whose animation doesn't anticipate, we see Mario springs up stiff like the block of pixels that he truly is. He goes from resting position to flying, without any anticipation for the jump. This comes across as stiff and unnatural. You would be pretty surprised if you saw a person in a park jumping like Mario to catch a freesbee, that would defy the laws of physics.
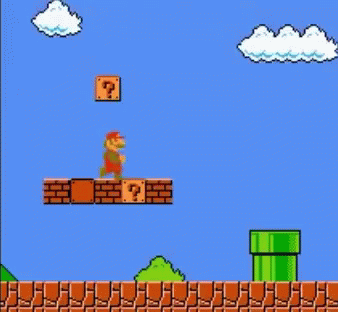
Games like Prince of Persia used anticipation in the jumping animations. Observe the difference with Mario. We interpret this visually as being more realistic, closer to our natural behaviour.
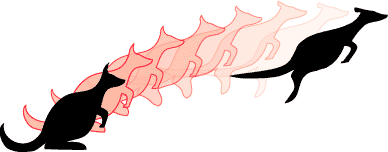
Arc
We experience arcs when we see gravity at work. A ball thrown in the air describes and arched trajectory. It is our intuitive expectation of how things should move when they are thrown or when they fall.
Secondary action
Secondary action is your hair waving in the air when you ride a bicycle, it is your clothes wrinkling and strechting as you sit, it is the pillow giving way under the weight of your head as you lay on it.
Timing
As they say in theatre: timing... (wait for it) is everything. A badly timed action will come across as forced and fake, it will affect how believable it is.
Timing can be manipulated for your desired effect, but it will look bad when it is inconsistent. You might decide to go for a slightly more uptempo timing like the animation in the bottom, but you should then keep that same timing in other animations during the experience, inconsistency will otherwise break the illusion.
If you have two characters in your screen moving with differently-timed actions, it will break the illusion of both and look terrible.
Exaggeration
Some CGI movies are so very realistic that they are also totally boring. Hyper-realism comes across as cold and characterless, your work will lack personality. You want to have carefully crafted imperfections, exaggerating something is a good way of introducing those imperfections.
In 3D animation in particular this is hard, most animation packages are so consistent in their realism that 3D artists often have to spend a lot of effort consciously introducing imperfections, otherwise the results are totally lifeless. In part 3 you can see examples of contemporary animators that work with these imperfections in order to break software's hyperrealism and create an aesthetic that is their own.
Easy in & easy out
Very few things in our daily experience move at a constant speed, normally things pick up speed while they start from a static position and slow down to a stand-still when they start from a moving position.
Easing is BY FAR the most used animation technique in UX/UI design, you see it all the time in smartphone apps. It is sooooooooo overused in fact that you expect to see it and it has become fairly cliche through overuse.
Even creatures that to our eyes we perceive as seemingly standing still are actually pushing themselves constantly, moving quite vigorously, just on a different time-scale from ours.
In fact when you look at a time-lapse of a plant you realize that being a plant is actually a pretty busy affair. Just like us they are constantly in action, moving ever so slightly, speeding up and slowing down, easing in and out. Our plant friends are a busy lot, racing through life just like we do, just on a different timescale.
Follow through
Continous vs. Pose to pose
This is perhaps more useful in traditional hand-made animation, in digital animation this process is called "tweening" and it is often computer generated.
Appeal (or Flair)
This cube seems to be having fun. How can have a boring geometric object as a cube be having so much fun? There's no such thing as even a boring line if it's animated with flair.
Part 2: animation in digital media
This section is quite large and goes from concepts that are generaly useful, to very specific details including math and code. Take your time to go through it and keep the link around to come back to it as you work on your poster. It's meant more as a reference that you can come back to, than a reading that you are supposed to get the first time around. Maybe it's a good moment to get a cup of tea before you go through it.
Animation in devices
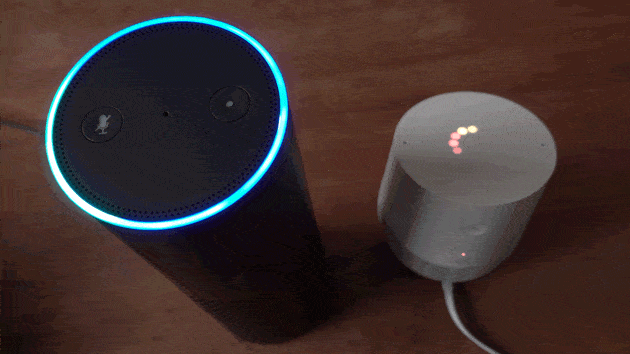
Animation isn't used only in film and screen-based work alone. If you pay close attention, you will see animation playing a large role in your daily experiences with physical products as well. A classic example of excellence in UX for product design, and a symbol of Apple's obsession with attention to detail, is the sleeping light of the original macbooks. It was a really ground-breaking detail for something that nobody else seemed to have ever cared about.
The macbook sleeping light
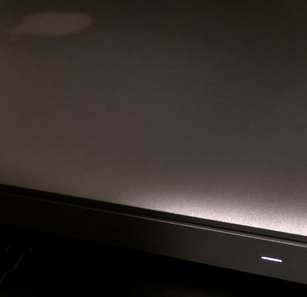
I recall listening to a rare lecture by Jony Ive in London back in the late 1990s where he explained that, when you were trying to sleep, the old sleep LEDs of laptops would blink on and off harshly, lighting up your entire bedroom each time which made it harder for some people to get to sleep and irritated people.
They therefore set out to create a more relaxing light which was not so aggressive and seemed more anthropomorphic.
As simple as this may sound, it meant going to the expense of creating a new controller chip which could drive the LED and change its brightness when the main CPU was shut down, all without harming battery life.
Details matter!
The follow me 🐰 rabbit
Tweening
Tweening or "in-betweening" is the act of filling-in the frames in between the keyframes. The term comes from traditional hand-drawn animation. In animation companies like Disney senior animators would draw the keyframes and junior animators where called "tweeners", they drew all the frames in between the keyframes.
Today we still use the term tweening to refer to the process of filling-in between keyframes, only now we mostly use computers to do the tweening for us.
In the above illustration we see the keyframes as black and the tweened frames as red transparencies.
Principles of computational animation
When we animate something we can start with few intuitions and tweak our way to a satisfactory result. One factor that we need to take into account is the duration of our animation. We might start by saying "ok, I want this action to last 1.2 seconds (1200ms)". Or we might want to align it with some human factor, such as the perceived duration of a heartbeat (~850ms) or the blinking of an eye (~40ms) or a full breathing cycle (~4200ms), we begin with a general idea of how long the animation should last.
In computational media the way that time in animation is dealt with, is by using a percentage, or a number between 0 and 1. When we are at t = 0 that means we are at the very beginning of our animation, the first frame so to speak. The last frame of our animation is at t = 1. t = 0.5 means that we are halfway our animation (50%), t = 0.65 is 65% in, and so on.
So in an animation that lasts 4200ms, for example, halfway or t = 0.5 would be duration * t or 2100ms. Conversely we can calculate in frames: if our animation is composed of 280 frames and it takes two seconds to run its course, then t = 0.5 will be exactly at frame 140, and s = 1000ms.
Numbers between 0 and 1 have various interesting properties. For example you can multiply two of these t-factors and the resulting value will still be between 0 and 1. This property allows us to composite tweening functions and layer them in powerful ways.
You will see that these principles apply not just to animating in code, all software packages that deal with animation use the same principle. Frames, framerates (how many frames per second), durations, timecodes, the t-factor (or percentage) are the way in which we refer to timing in computational animation.
Linear interpolation (aka LERP)
Let's say we want to animate a property between two values a and b, in a certain amount of time determined by duration, that we will measure in milliseconds. This could for example be expresed in code in this way:
function lerp(a, b, t) {
  return (1 - t) * a + t * b;
}

var tfactor = (millis() - startOfAnimation) / durationOfAnimation;
var xposition = lerp(a, b, tfactor);
lerp will return a value between a and b that is tweened from the tfactor (which is a number between 0 and 1 that expresses a percentage that determines how far into our animation we are)
var tfactor = (millis() - startOfAnimation) / durationOfAnimation;In p5js millis() gives us the current time in milliseconds, startOfAnimation is a variable where we store the time at which out animation began, and durationOfAnimation is the total duration of our animation in milliseconds. The result of this calculation is a number between 0 and 1 (you can also read it as a percentage) of how far into our animation timing we are. So it will be 0.5, when we are half-way through and so on.
As you can see LERPing alone makes for fairly boring animation. It is rigid, linear, perfectly predictable. Let's make it more interesting shall we!?. Let's composite two motion factors for the x and y position and let's take human imput from the mouse movements and use LERP to follow the mouse.
DIY try removing the LERP call in the previous code and use
mouseXandmouseYinstead to see the difference in the motion of the ball.DIY try swapping xpos and mouseX above and the same for Y and see what happens
Deeper into the rabbithole 🐰
Read more about how LERP is used in UI.
- Understanding linear interpolations in UI animations
- Rachel Smith's Animation tip LERP
- Rachel Smith's Understanding The Intuition of Easing
- Rachel Smith's Let's talk about ease, please
Easing
Back in the Flash days Robert Penner was dissatisfied with the standard programmatic methods of describing motion, most advanced animation methods at the time required of sophisticated tools (like Flash) with timeline and curve-editing tools. But this wasn't flexible enough for easy reusability as you had to manually tweak the animation curves for every instance of an animation. Penner created the first flexible, reusable easing functions that allowed designers to script motion in UI elements.
There is a before and after Robert Penner in the world of screen-based interactions, these equations are the cornerstone of most UI frameworks in JS and mobile. once you learn about easing and Penner's equations you will start seeing it everywhere in your smartphone. Penner's work has been hugely influential. He did the heavy lifting, math and coherent interface that allows the rest of us to create effective and smooth UIs.
What is easing?
Easing is a functional relationship between time and space: this means that we can ask an easing formula how many units of space we have to move for each unit of time. You can think of easing as a perfect redezvous partner: I set the time and the easing function sets the place.
Let's explore these functions one by one: Easing Equations
This is how the implementation of an easing function looks like, this one is the "Quadratic Easing In"
var Easing =
  // accelerating from zero velocity
  easeInCubic: function(t) {
    return t * t * t
  },
};
Follow the bunny 🐰
- Time in computational animation
- Interpolation by a demoscener named Sol.
- Book chapter on Motion, Tweening and Easing
- Easing for the d3 visualization library has some nice graphic representations of the easing functions
- Easing animation explorer
Prototyping tools and easing
There are some tools out there that allow you to do interactive prototypes and you can edit basic animations with them. The two that my students use more commonly are:
You will see that the animation options that these tools offer, while being good for most purposes and extensive enough to cover a lot of different projects, they are none the less limited. A more versatile tool that is a bit more open ended (but has a steeper learning curve) is Facebook's Origami. Origami is fundamentally a visual programming tool, so in a way you will be composing your animations in code, it's just code that isn't represented as text, as in p5js.
In & Out
You will see that most functions have an In & Out variant. In means, apply the easing at the beginning of our animation and Out means apply it and the end, In and Out together means apply in both. Generally for sliding graphics you do not need the In part of the animation if your element comes into view from outside the visible area of the screen, and you want to avoid the Out part of the easing if the element goes outside the viewport.
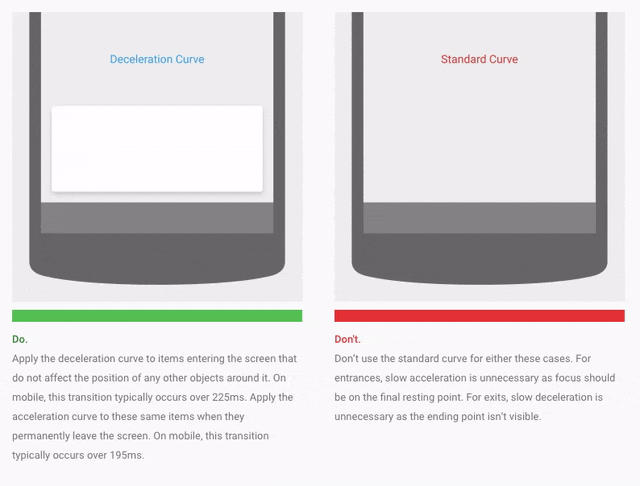
If the element is always visible through the entire animation, using both In and Out easing will make it appear smooth.
A little aside on easing and our freaky friend CSS
The CCS3 animation techniques also offer easing functions, many of Penner's equations are also available in CSS. In addition, CSS also supports a more generic approach using Bezier curves. In the CSS standard the name used to give an element easing properties is transition-timing-function (see documentation ).
transition-timing-function: ease-in-out;For example, is equivalent to:
transition-timing-function: cubic-bezier(0.42, 0, 0.58, 1);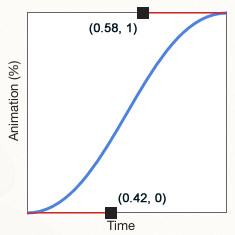
This cubic-bezier stuff can be a little confusing if you are not strong in visualizing math, so here's a little helper site that allows you to quickly draw a curve and get the bezier parameters: cubic-bezier.com. This will help you in your CSS compositions.
This other tool Ceaser allows you to chose easing functions and see them live and will give you the CSS code needed to implement the animation you want. The tool is a bit ugly to use but works great. Superhandy!
Using easing in your own custom animations
I have prepared this little javascript library with all of the Penner easing equations, so that you can just copy and paste it into your projects.
/*
 * Easing Functions - inspired by http://gizma.com/easing/
 * only considering the t value for the range [0, 1] => [0, 1]
 */
EasingFunctions = {
  // no easing, no acceleration
  linear: function (t) { return t },
  // accelerating from zero velocity
  easeInQuad: function (t) { return t*t },
  // decelerating to zero velocity
  easeOutQuad: function (t) { return t*(2-t) },
  // acceleration until halfway, then deceleration
  easeInOutQuad: function (t) { return t<.5 ? 2*t*t : -1+(4-2*t)*t },
  // accelerating from zero velocity
  easeInCubic: function (t) { return t*t*t },
  // decelerating to zero velocity
  easeOutCubic: function (t) { return (--t)*t*t+1 },
  // acceleration until halfway, then deceleration
  easeInOutCubic: function (t) { return t<.5 ? 4*t*t*t : (t-1)*(2*t-2)*(2*t-2)+1 },
  // accelerating from zero velocity
  easeInQuart: function (t) { return t*t*t*t },
  // decelerating to zero velocity
  easeOutQuart: function (t) { return 1-(--t)*t*t*t },
  // acceleration until halfway, then deceleration
  easeInOutQuart: function (t) { return t<.5 ? 8*t*t*t*t : 1-8*(--t)*t*t*t },
  // accelerating from zero velocity
  easeInQuint: function (t) { return t*t*t*t*t },
  // decelerating to zero velocity
  easeOutQuint: function (t) { return 1+(--t)*t*t*t*t },
  // acceleration until halfway, then deceleration
  easeInOutQuint: function (t) { return t<.5 ? 16*t*t*t*t*t : 1+16*(--t)*t*t*t*t }
}Random motion
Perlin noise
For a more in-depth explanation of noise watch this Dan Shiffman video on random vs. noise:
Physics-based animation
Physics-based animations do not have a defined curve or a set duration. So far we have looked at animation as being controlled by durations and motion curves that express a change over time. This way of animating becomes second nature after you have learned and internalized it, but in fact, nothing in the real world moves like that. In our perceived reality, things move (e.g. are animated) by principles such as action-reaction and by the confluences of forces that bodies are subject to: things are propelled and pushed, things roll down a slope, things collide with other things and some of their energy is transferred to the things that they collide with, things are made of different materials that give different properties to their motion.
Hand-crafted animation using tweens can give us a great deal of control, down to the frame but to model the types of motion that we are accustomed to see in real life, tweens are a very poor tool. For animations that more closely resemble the behaviour of objects in the world around us, we can use physics-based motion principles. You will need to blow the dust off your physics books and freshen up on those newtonian physics formulas though! Luckily there are tons of javascript libraries to help us with the heavy-lifting.
Animation APIs parameterized by duration and curve are fundamentally opposed to continuous, fluid interactivity. — Andy Matuschak (ex Apple UI-Kit developer)
You can find some examples of what is possible with this kind of motion libraries at the p2.js demos page. p2.js is a javascript library that implements a generic physics engine.
Here are some examples:
- Plucking of a string using the Physics library.
- Magnetic marble using the Physics library.
Some UI motion toolkits that implement physics-based models:
More generic physics libraries:
- matter.js I like this one
- PhysicsJS demo page
- Ammo.js shoft-body physics.
Gravity
See the Pen Popmotion 8 example: Physics playground by Popmotion (@popmotion) on CodePen.
Inertia
See the Pen Pure 8.6: Inertia playground by Popmotion (@popmotion) on CodePen.
Springs
Here are some demos to play with in JSFiddle and Codepen.
See the Pen Springing circle by Rachel Smith (@rachsmith) on CodePen.
See the Pen Springing circle radii by Rachel Smith (@rachsmith) on CodePen.
See the Pen Springy svg curves by Rachel Smith (@rachsmith) on CodePen.
Some other popular implementations of spring-based animation
Facebook's Rebound implements basic spring dynamics and was first written to do the animations of the Facebook chatheads in the Android version of the app. There is a Javascript library that does the same thing.
React Spring is a motion library for the React UI framework.
Fluid-dynamics
Google's LiquidFun was one of the first implementations of fluid dynamics for the browser, unfortunately although it still works it doesn't seem to be maintained anymore.
Magnetism
(See springs)
Particle systems
Since the early 1980s, particle systems have been used in countless video games, animations, digital art pieces, and installations to model various irregular types of natural phenomena, such as fire, smoke, waterfalls, fog, grass, bubbles, and so on. — Dan Shiffman
A particle system is basically a large collection of particles, where each particle has certain attributes that model its physical behaviour for example position, velocity, acceleration and a lifespan. Normally that's all it takes to create a collection of particles, however a particle system might also model certain kinds of forces that affect this individual particles, such as fluid simulations, explosions, fire, etc. A particle system is a perfect exercise for a person getting first involved in physics-based animation as it is relatively simple to code, offers high impact results and if you want to continue perfecting your particle system there's plenty that you can do in future version to make it fit your purposes.
See the Pen 30,000 Particles by Justin Windle (@soulwire) on CodePen.
See the Pen Gravity Points by Akimitsu Hamamuro (@akm2) on CodePen.
See the Pen Text to particles by Louis Hoebregts (@Mamboleoo) on CodePen.
See the Pen Particles write text by Marco Dell'Anna (@plasm) on CodePen.
Down the rabbit hole of particle systems 🐰
- Code one form scratch by following Dan Shifman in Nature of Code
Animating given the mouse position
Animated posters
Acknowledgements
The section in Disney's animation principles borrows heavily from this Creativebloq article. Including the sample animations made by Vincenzo Lodigiani
The example of how CSS animation maps to Penner's work is derived from @gilmoreorless. Thanks!
Icons for trigger examples from The Noun Project.
Some of the spring-based examples are from this article Hack Physics and JavaScript (part 3).
Easing functions javascript implementation was obtained from this Gist https://gist.github.com/gre/1650294 by Gaëtan Renaudeau.
Perlin noise examples from Gene Kogan.
Part 3: other animation techniques + a small selection of great digital animators
In this section I do a very light-touch review of other animation techniques sometimes used in digital media and a small selection of the work of great digital animators that I think are worth your while. Of course there are many more, and I am sure that you have your own favorites, but these are the one's that I chose because I think that they are doing work that is digital-native.
Rotoscoping
Rotoscoping consists on tracing your image using drawing tools in an animation package to trace on top of a life-action video.
Another one by Alberto Mielgo:
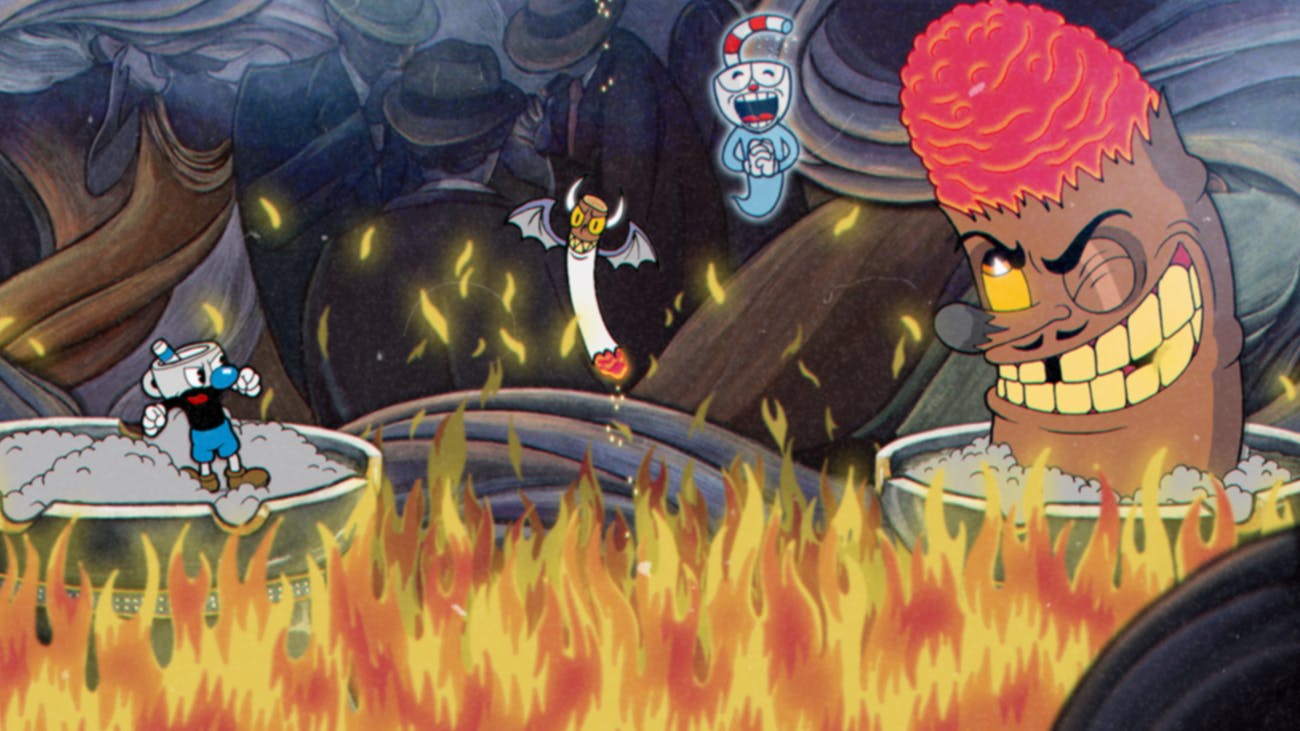
Study case: Cuphead video game
Evolutionary models
Behold the work that Karl Sims did when most of us were still wearing nappies. This work uses a combination of physics-based modelling and evolutionary algorithms to let these geometric creatures learn by themselves to move in the worlds that were designed for them. They spring into existence through code and they slowly evolve to learn strategies to achieve specific goals, such as move forward or move towards a specific goal or be the first to touch a cube in the scene.
The near future: machine learning based animation
There is A LOT of efforts on bringing machine learning to the field of animation, a lot of it comes from the gaming industry but soon many of the 2D and 3D animation packages will start including these kinds of techniques that will make the job of animating a lot less human-labour-intensive. This is from a recent paper, soon part of a tool near you:
Aesthetics of animation history and trends
Let's look at the first episode of La Linea, try to spot some of the principles above and observe how they are used by master animator Osvaldo Cavandoli.
Artists like Alberto Mielgo are masters of introducing painterly artifacts in their texturing work, if you analyze their work up close, you will see the imperfections in the broad strokes, the exaggerated camera angles. Yet, when things are in motion your mind blends these imperfections and perceives dynamism, it makes the work pop out.
Another work by the same art director:
TRON UPRISING Art Direction from alberto mielgo on Vimeo.
Trend: non-photorealism
There is a trend in digital animation to move away from photorealism and explore the posibilities of animation packages and the synthetic virtual images that they can create for aesthetic effect. Art director Alan Warburton made a wonderful video explaining this trend that I think is worth your while.
Goodbye Uncanny Valley from Alan Warburton on Vimeo.
There are quite a few people ding work along those lines, I am sure that you know a good bunch of them yourselves as there are quite some of them that are big on instagram. Here are two that I particularly like:
This video from Nikita Diakur is an example. Nikita is a well-known animator that works with digital puppetry software and explores the quirks, glitches and failures of this software for aesthetic effect. Although things look wrong in the worlds that he creates, there is a consistency that makes the work quirky and interesting. Nikita is an expert user of the software packages and misuses them for aesthetic effect.
Fest from nikita diakur on Vimeo.
Pussykrew is a Polish duo that have been putting out amazingly innovative work for over a decade. They have done many music videos using non-photorealistic graphics. Pussykrew is a very versatile studio with a very characteristic art direction style based on the aesthetics of digital 3D modelling software packages. Their work is also characterized by the avoidance of photorealism emphasizing the synthetic qualities of simulation and software-based rendering. Worth your while to check them out. Studio Pussykrew
And how about you? What are your favorites?